At the heart of the Universal Radio Controller is the STM32F302 cpu running the AIOC open-source firmware.
Along with the 32-bit ARM Cortex M4 core are a host of interfaces to manage the radio functions needed such as:
- A USB interface
- Serial ports
- High resolution Analogue to Digital converters
- High resolution Digital to Analogue converters
- Digital Signal Processor (DSP)
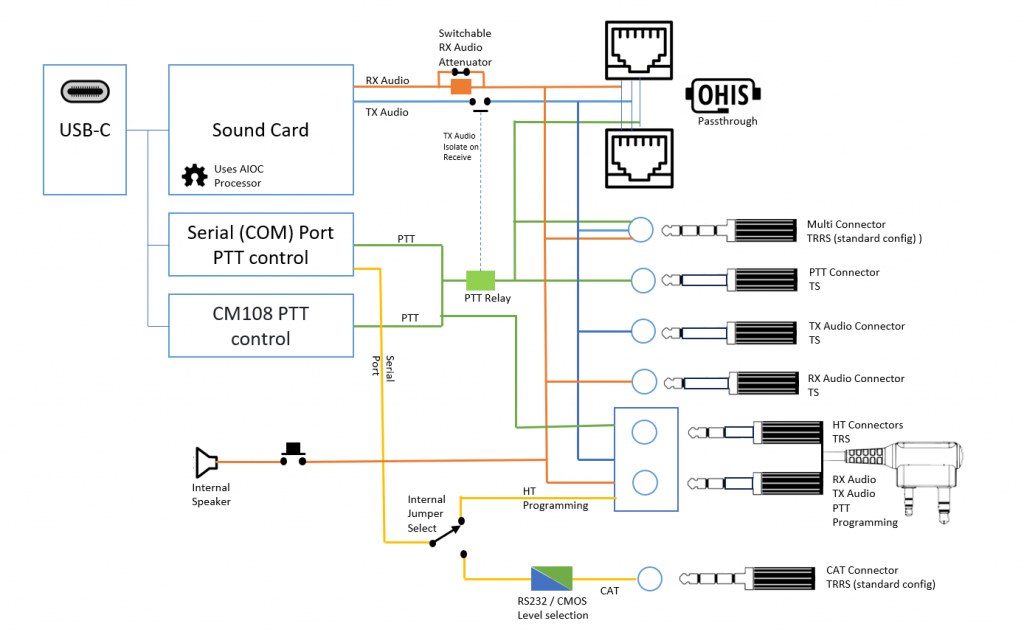
The Sound Card, serial port, PTT and CM108 functions are primarily provided by the CPU. The firmware is upgradeable from the AIOC repository on GitHub. https://github.com/skuep/AIOC and the standard AIOC programming jumper is present on the URC main board.
The open source firmware is provided under MIT License – Copyright (c) 2022 Simon Kueppers
There are many advantages of adopting the AIOC open source elements to the URC, bringing a larger community of support and also adding weight to the AIOC project through increased usage. For instance, the documentation provided here for the DigiPI interop will also work with the AIOC.
The AIOC project is very much alive and Simon Küppers and team are busy fixing bugs and issues, and community input and assistance is essential for the continuing evolution of the project.
Currently there are only a few known issue that have affected URC customers, I am keeping the log here:
- HTs with rubber-duck antennas send excessive RF into the URC and cause problems- workaround is to use an antenna connected by a coax cable.
- DireWolf on MacOS can have a problem with audio/PTT – workaround is to use DireWolf on Linux/Pi/Windows. This may be resolved by firmware upgrade.
Re-loading the firmware on your URC (V2 and above)
To re-load or upgrade the firmware, use the following process. I will endeavor to have the latest AIOC firmware on this site in the downloadable ZIP file.
1) – The CPU needs to be in programming mode, install a jumper on the programming pins in the corner of the main board by the USB socket (borrow the one from the attenuator setting pins).
Later models of the URC have a PROG button instead of the jumper. Hold down the button whilst applying power to the URC to enter programming mode.

2) Connect the unit to a USB port on your PC (the power light will not come on in programming mode)
3) Download the flash utility from this link:
4) Unzip the file into a directory.
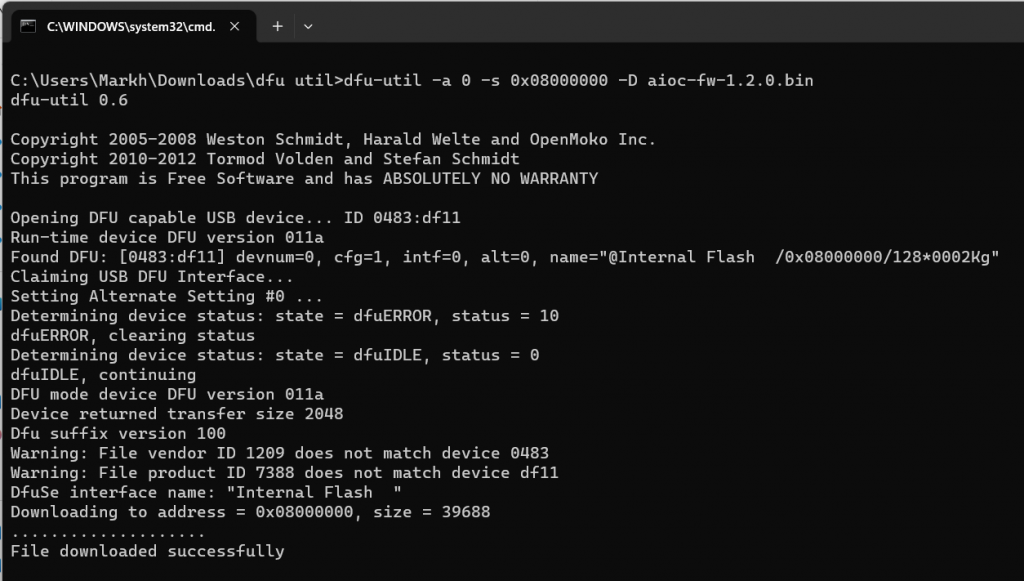
5) Run the flash.bat file
flash.bat will attempt to load the firmware every 10 seconds until you stop it or close the window (this is the way I flash a batch of new units when they arrive)
6) When you unit is flashed, stop the update process (close the window) then unplug the USB-C connector and remove the programming jumper or release the Prog button.
7) When you next connect the unit, you should see the Power/TX initialize
The flash process is complete!