The following guide covers the steps to modify any version of the AIOC to use in an AllStarLink 3 node using the latest V1.3 firmware and Virtual COS. (for hardware COS implementation, please see my other posts).
The benefit of this implementation is:
- It’s easy for any ham to build an AllStarLink node
- No modification is needed to any radio
- The AllStarLink software is unmodified, no reprogramming or swapping files is needed.
- An AllStarLink node can quickly be made from a low cost radio and can be rapidly re-deployed.
What you will need to make an AllStarLink node:
- A Raspberry Pi model 3B or later (an attached screen and keyboard can help).
- Two Micro SD Cards (one for the AllStarLink software and another for this programming tool software)
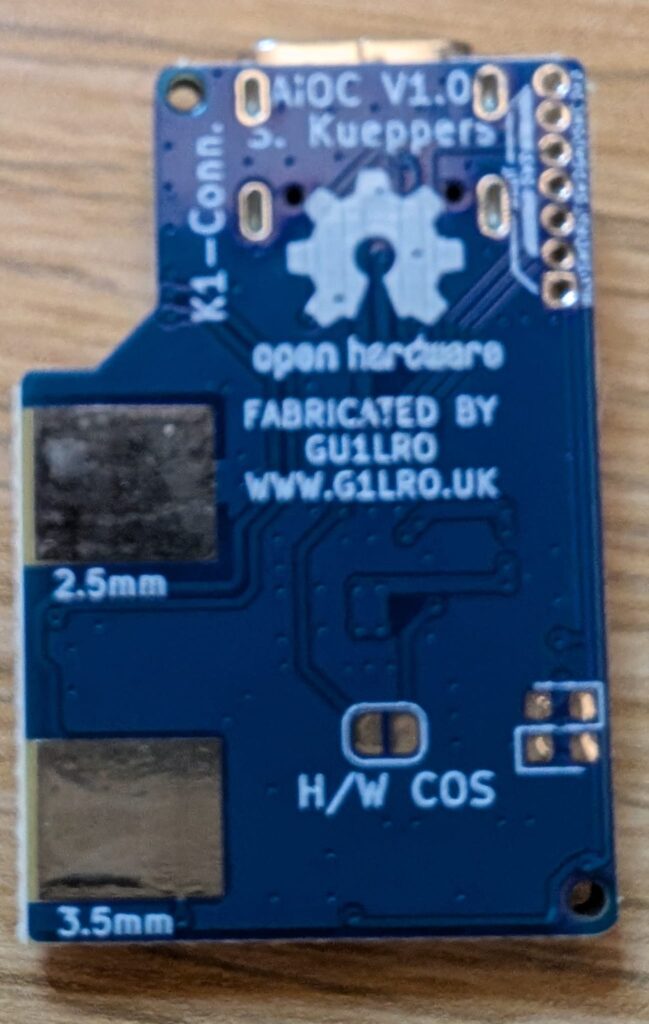
- An AIOC card
- A n HT radio (Baofeng, Quansheng etc.)
- A computer and an internet connection.
This article does not cover any AllStarLink node setup or configuration; as a recommendation for ease of setup. I recommend AllStarLink 3 for best results and to match the settings in this guide.
To run the various software components needed, a temporary ‘clean machine’ is built by making a new SD card image for a Raspberry Pi. This ensures the process will be reproducible for everyone since no spurious software is involved. Once the updates are made, the Raspberry Pi can be put back to it previous tasks.
1 Preparing the Raspberry Pi for programming your AIOC or URC
You’ll need a Raspberry Pi (v3b or later) and a spare Micro SD card to load the specific software for making the AIOC or URC AllStartLink compatible.
If you are using an existing Raspberry Pi from your AllStarLink node to perform this process, shut down your node, remove the SD card and store it safely.
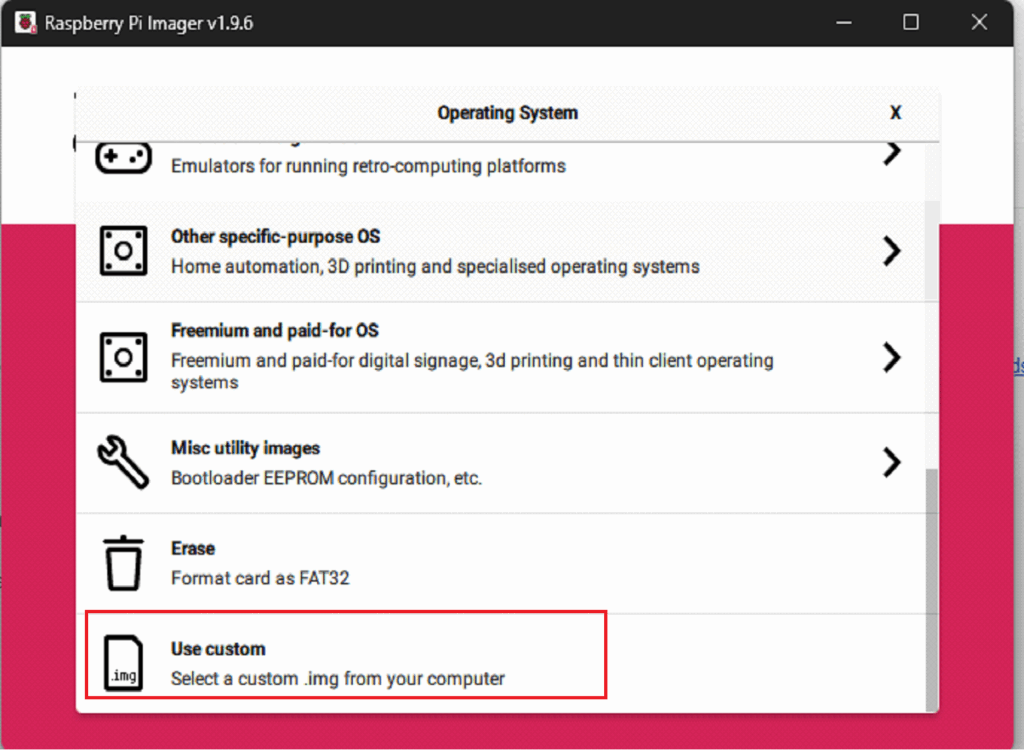
To enable the HID libraries used in the config software, we need to get an older bullseye version from the archive and not use a listed version from the Pi Imager.
Access the archive here::
https://downloads.raspberrypi.com/raspios_oldstable_arm64/images/raspios_oldstable_arm64-2025-05-07/
Download “2025-05-06-raspios-bullseye-arm64.img.xz” from that page,
Use the Raspberry Pi Imager to create the SD card, then when selecting the OS in Raspberry Pi imager, scroll to the bottom, select “Use Custom”, and then select that .xz file you have just downloaded:
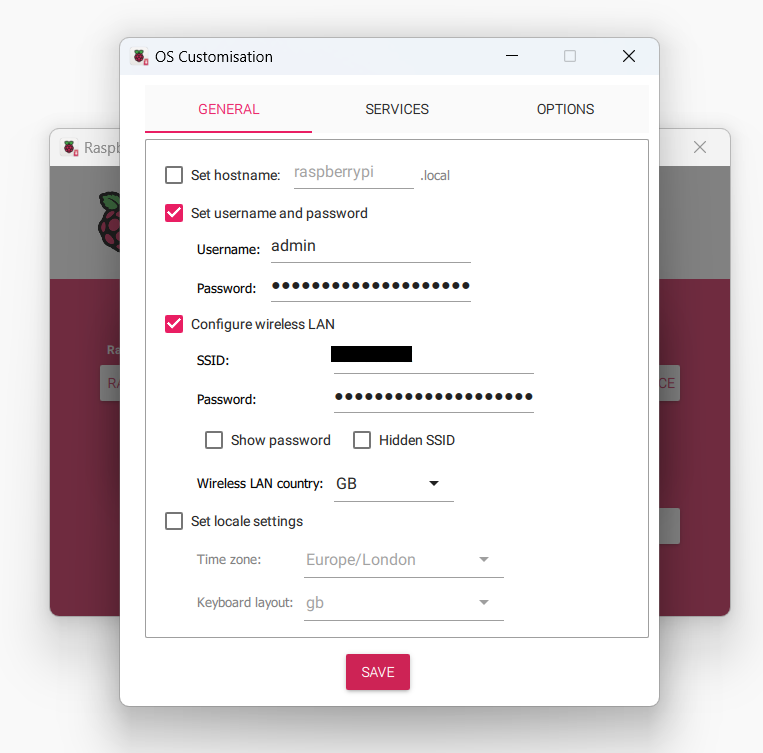
Using the option to pre-configure your WiFi and admin login.
If you don’t have a screen and keyboard connected to the Pi then use the SERVICES tab to enable SSH with password authentication so you can log in with Putty.
When the image creation is complete, insert the SD card into the Raspberry Pi and boot it up.
Use a screen and keyboard connected to the Pi, or an SSH login with Putty, to get to the terminal prompt. Use the username and password created in the imager software. (if you need info for connecting to a Pi without a screen/keyboard attached, this can help)
Once logged-in to the terminal, at the prompt, enter the following three command lines (pressing enter after each one) to set up the software:
wget www.g1lro.uk/1.3runmeonce.sh
chmod +x 1.3runmeonce.sh
./1.3runmeonce.sh
When the script is running, you may be asked to confirm ‘Y’ a few times, go ahead and do this to complete the installation of the software.
This automatic install process will load:
- The firmware and flash utility to upgrade your AIOC to V1.3 (latest version)
- Scripts to alter the identity of the AIOC CPU to emulate the CM108 device that AllStarLink is expecting to see and set the HW COS.
- A script to put the AIOC CPU back to the default ‘AIOC’ identity.
2 Upgrading the AIOC Firmware to the latest 1.3 version
Before attaching the AIOC to the raspberry Pi, it’s important to put it into DFU programming mode. This needs to be done prior to attaching the USB plug connected to the Pi.
For the AIOC single board, put a wire link across the programming holes. Be very careful as it’s quite possible to destroy the AIOC if the wire touches the wrong place.
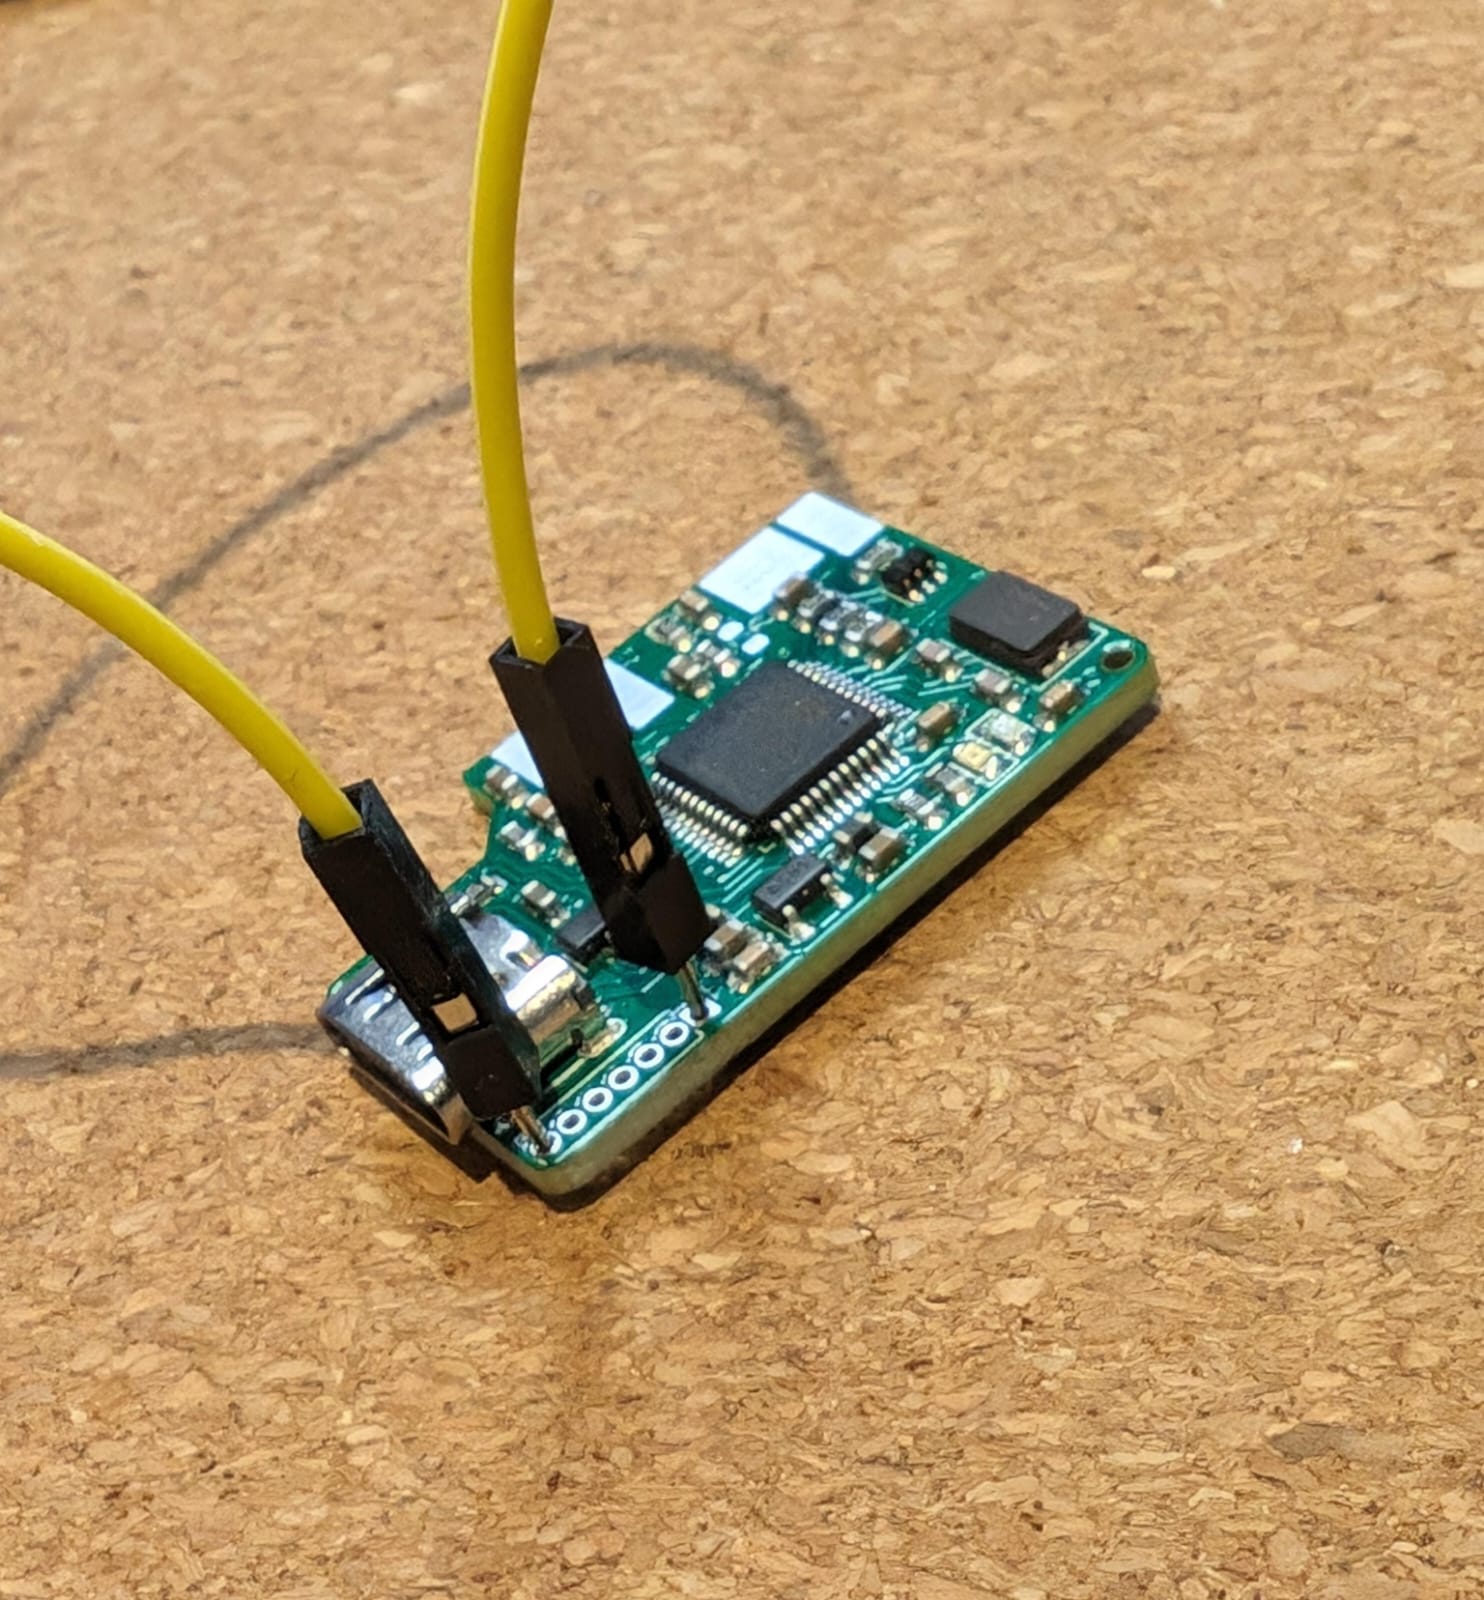
Use something like a breadboard wire to connect between the two end holes of the connector area next to the USB port. When you connect the USB lead from the Pi, the AIOC will be in DFU mode and no lights will show. Go to 2.1 below.
With the AIOC in DFU (firmware loading) mode, the lights will not come on, if they do, unplug and try again, something is not right with the jumper.
2.1 Run the Firmware Update on the AIOC in DFU mode
At the Pi terminal prompt type the following command:
./1.3flash.shThe Pi will now load the V1.3 firmware into the AIOC CPU and you should see something like this:
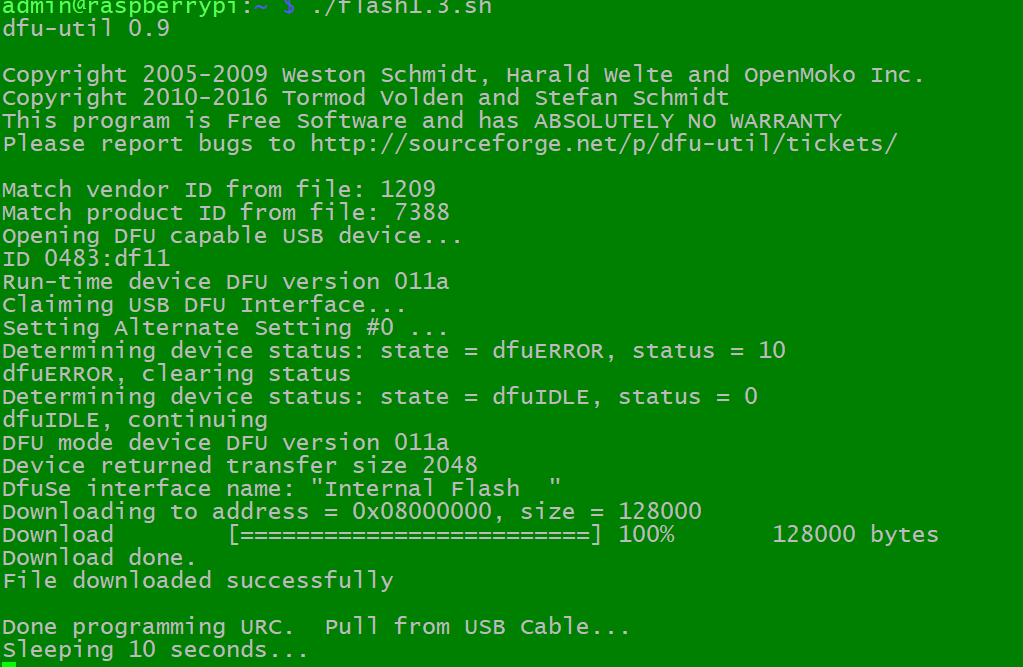
Press Ctrl-C to abort the flashing process as it will repeat every 10 seconds. Don’t stop it mid-download.
Unplug the USB cable remove any jumpers and and plug it back in again, make sure the lights illuminate on the AIOC. It is now running the latest 1.3 firmware.
You do not need to repeat any of the above steps again. Your device can remain on the latest V1.3 firmware permanently.
3 Change the AIOC identity for AllStarLink
The AllStarLink SimpleUSB setup (as used by HamVoip and others), is expecting to see the regular CM108 sound-card fob attached. The following process makes the AIOC CPU emulate the CM108 identity so the AllStarLink 3 software thinks that it has a CM108 attached.
Software in the V1.3 firmware also provides Virtual COS function to detect when the HT is receiving a signal and indicate this to the AllStarLink 3 software.
With the AIOC upgraded to V1.3, and plugged into the Pi with the lights on, run the following command:
sudo python aioc1.3vcos.pyYou should see something similar to the following output:
Manufacturer: AIOC
Product: All-In-One-Cable
Serial No: a602138f
Magic: b'AIOC'
Now USBID: 000c0d8c
Storing...

The AIOC is now configured ready for AllStarLink 3 with Virtual COS and CM108 Identity enabled.
Verify this by unplugging and re-plugging the AIOC from the Pi and then run the lsusb command to list USB devices, your Pi may display something different, but you should see C-Media adapter listed.
lsusb
Note: Virtual COS is triggered when audio is received (like a squelch) so if you stop talking for a period of time, the COS signal will go off.
4 Connecting up to AllStarLink 3
- Put the SD card for AllStarLink 3 back in the Pi if you took it out to run the programming tasks.
- Connect the AIOC to one of the USB ports
- Plug the AIOC into the HT
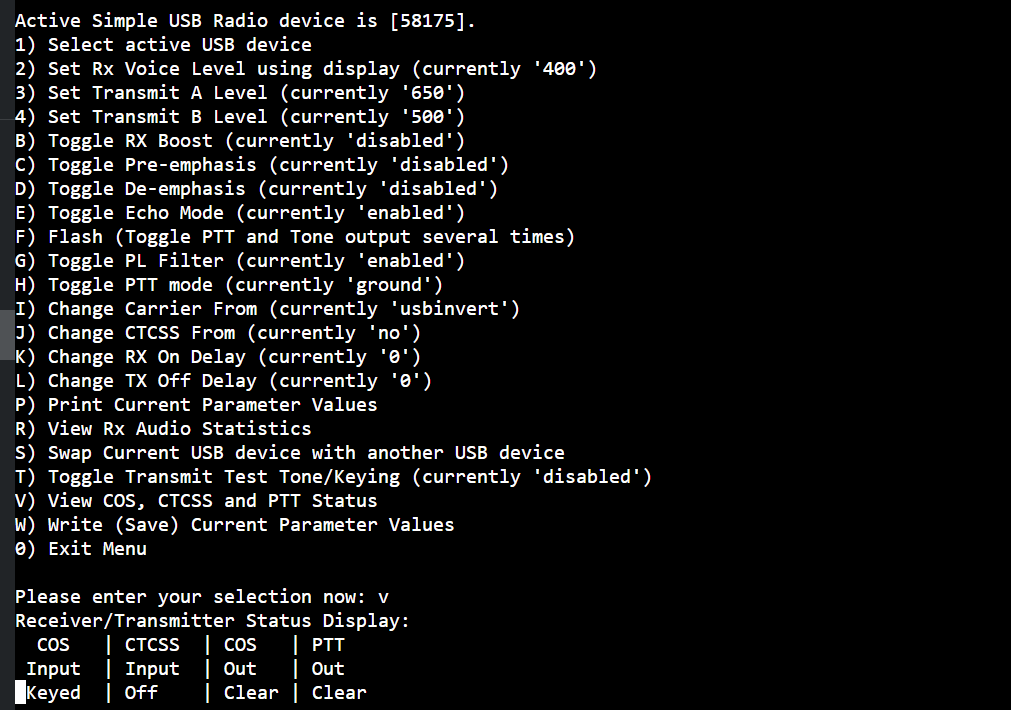
- Boot up AllStarLink 3 and run the SimpleUSB tune menu to set the audio levels. Remember that the volume control on the radio will have a large effect on the RX audio level.
SimpleUSB Settings
To make the transmit and carrier sense work in the correct way, make the following changes in the AllStarLink “simpleusb-tune menu” application in the ASL3 admin menu:
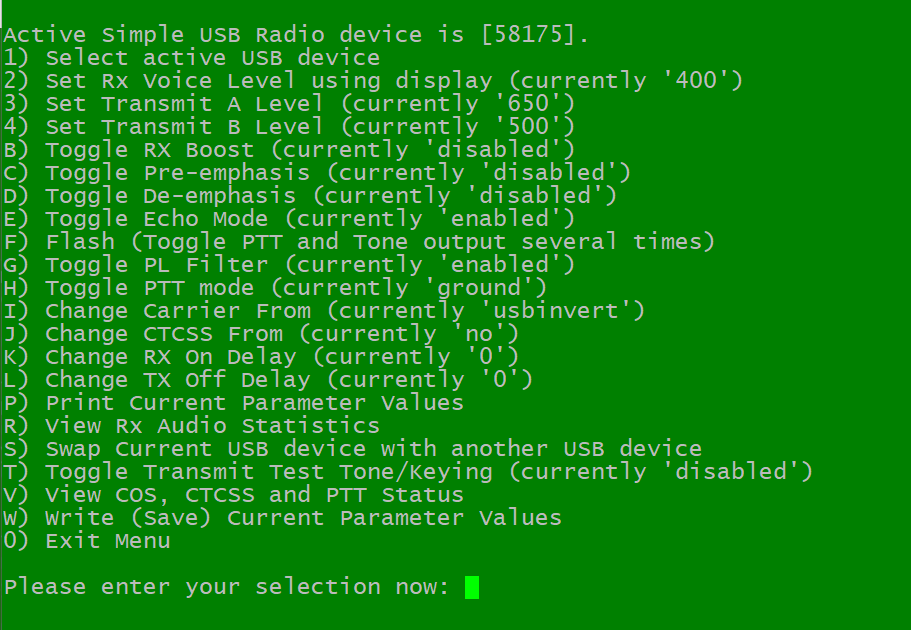
Set option H: PTT Mode to 'ground'- Set option I: Carrier From
to 'usbinvert‘ Set option J: CTCSSFROM to 'no‘
You can now tune the audio levels using option 3 and 2 (it’s easiest to set the RX audio using the volume knob on the HT).
That’s it, you are ready to go!
5 Reverting the AIOC identity.
The re-programmed AIOC or URC will show up as “C-Media Electronics, Inc. Audio Adapter” for any software that is looking at audio devices, this does not affect the operation of the device, but if desired the configuration can be reverted to the original AIOC identity.
To revert the AIOC or URC to its previous identity,
- Boot a Raspberry Pi with the SD card we have made above.
- DO NOT run the ‘runemeonce.sh’ program
- Once logged into the terminal and with the AIOC plugged-in, run the following command:
sudo python aioc1.3revert.py
You should see the following result:
Manufacturer: AIOC
Product: All-In-One-Cable
Serial No: a602138f
Magic: b'AIOC'
Loading Defaults...
Current PTT1 Source: PTTSource.SERIALDTRNRTS|CM108GPIO3
Current PTT2 Source: PTTSource.CM108GPIO4
Current CM108 Button 1 (VolUP) Source: CM108ButtonSource.IN2
Current CM108 Button 2 (VolDN) Source: CM108ButtonSource.VCOS
Current CM108 Button 3 (PlbMute) Source: CM108ButtonSource.NONE
Current CM108 Button 4 (RecMute) Source: CM108ButtonSource.NONE
Now USBID: 73881209
Storing...
The AIOC CPU is now reverted and will show up as “Generic All-In-One-Cable” or “AIOC” in any software.
Verify this by unplugging and re-plugging the AIOC from the Pi and then run the lsusb command, you should see All-In-One-Cable listed
lsusb