
Earlier this year I announced a refresh of the AIOC hardware — new hardware COS circuitry, improved voltage regulation, and a promise of a definitive how-to guide and setup script for ASL3. This is that guide.
The new G1LRO AIOC board stays true to the original form factor while adding proper hardware COS support — both speaker bias (for Baofeng-class HTs) and logic-level (for radios like the Tidradio H3 and SA818-based builds). Combined with firmware 1.3 or later and native AIOC support in ASL3, the setup process is now cleaner than it has ever been: no CM108 ID remapping, no Python scripts, no manual file editing.
This guide also works for older and other AIOC variants and the URC.
If you’ve built an ASL3 node from an older guide — including earlier posts on this blog — the approach has changed significantly. ASL3 now supports the AIOC natively, and the new setup script handles all the configuration automatically.
What’s New About This Setup
- PC-based config — everything done through a browser and the Raspberry Pi imager; no Linux expertise needed
- One copy/paste command completely configures ASL3 for the AIOC
- Specific support for the G1LRO dual-COS AIOC — hardware COS for reliable, professional-grade performance
Quick Jump Menu:
- Create ASL3 SD Image – Skip if you have a working ASL3 node
- Initial ASL3 Setup – Skip if you have a working ASL3 node
- AIOC Hardware COS
- AIOC Settings Configuration
- ASL3 Custom Script
- Tune ASL3
- VCOS option
- Re-Flash your AIOC firmware
What You’ll Need
| Item | Notes |
|---|---|
| ASL3 Registration | You’ll need a node number and password — registration not covered here |
| PC with Chrome browser and SD card slot | Needed for flashing ASL3, AIOC setup and programming over USB |
| Internet access | For both the PC and the Raspberry Pi |
| Raspberry Pi | Zero 2W or better — Model 3B is ideal |
| USB data lead | Make sure it’s not a charge-only cable |
| Ferrite cores | To wrap the USB lead — optional but recommended |
| Micro SD card | 16GB minimum, V30 speed rating or better |
| G1LRO AIOC | Dual-COS version — firmware 1.3.0 pre-installed. You can user other AIOC. |
| HT radio for the node | Baofeng/Quansheng class work well |
| Second HT radio | To call, test and use the node |
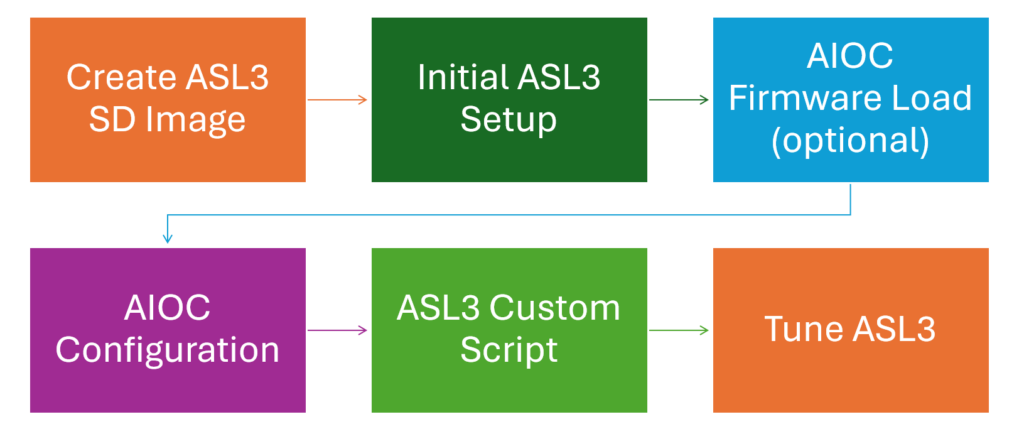
The Process at a Glance
The setup follows six straightforward stages:
Step 1 — Create the ASL3 SD Image
Everything starts on your PC.
- Install Raspberry Pi Imager 1.8.3* Download it from:
https://github.com/raspberrypi/rpi-imager/releases/download/v1.8.3/imager-1.8.3.exe - Download the ASL3 image*
https://repo.allstarlink.org/images/pi/allstar3-arm64-3.0.20.img.xz - Burn the “Custom” image using Pi Imager. When prompted, click Yes to apply OS customisation settings:
- General tab: set your Wi-Fi network name and password
- Services tab: enable SSH and set a password
- Burn the image to your SD card.
*Note the Pi Imager and ASL3 versions are not latest as there are login issues with later versions.
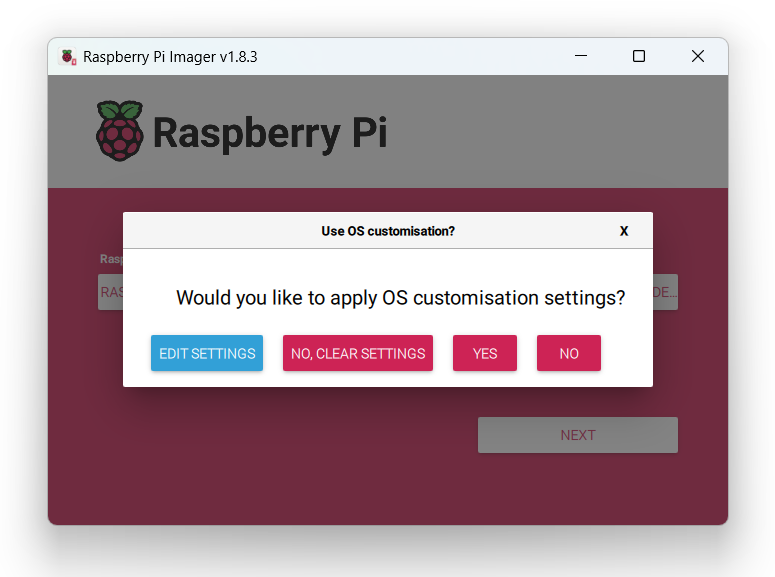
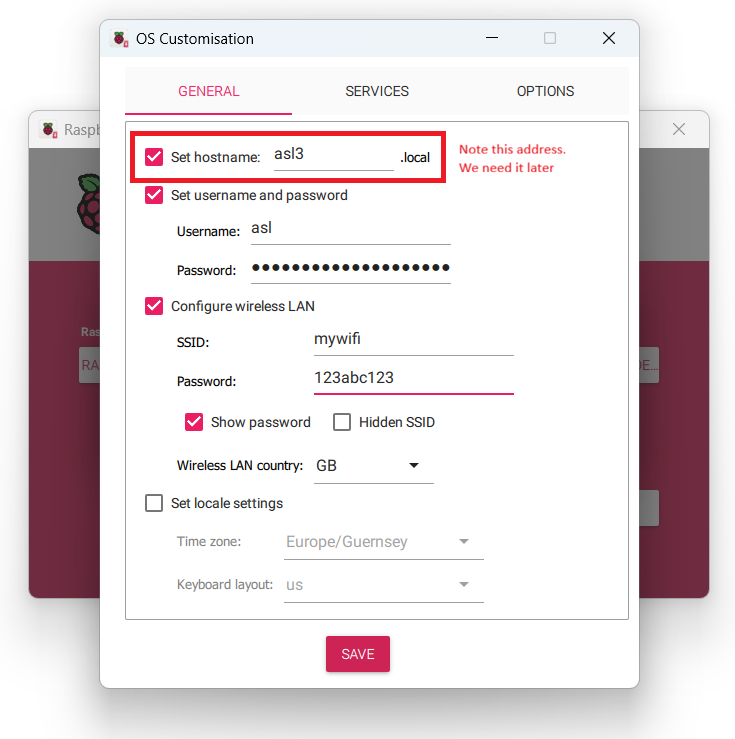
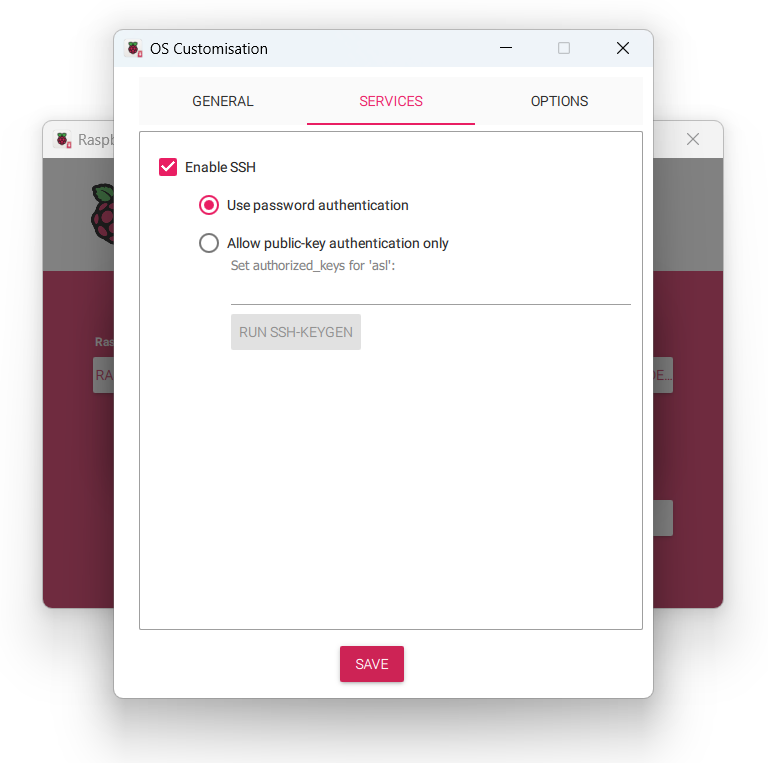
Note: Setting Wi-Fi credentials here means your Pi will connect automatically on first boot — no keyboard or monitor needed.
Step 2 — Initial ASL3 Setup
- Install the SD card and power up the Pi and give it a minute or two to boot.
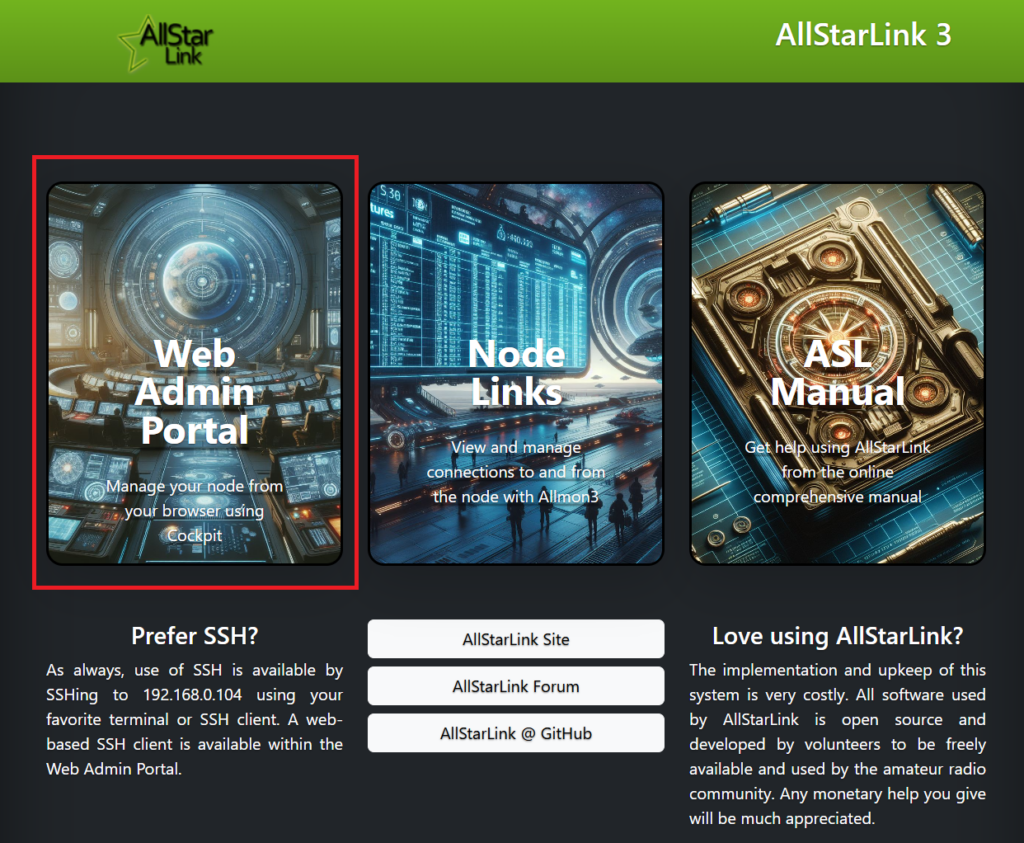
- Browse to the host name set earlier e.g. asl3.local — you’ll see the ASL3 server page, select the Web Admin Portal.
- If the hostname is not reachable, you’ll need to find the Pi’s IP Address and browse to that. Use a tool like
nmapand additional help here) - Bypass any browser security warning and log in with the username and password you set in Pi Imager.
asl-menu Quick Steps
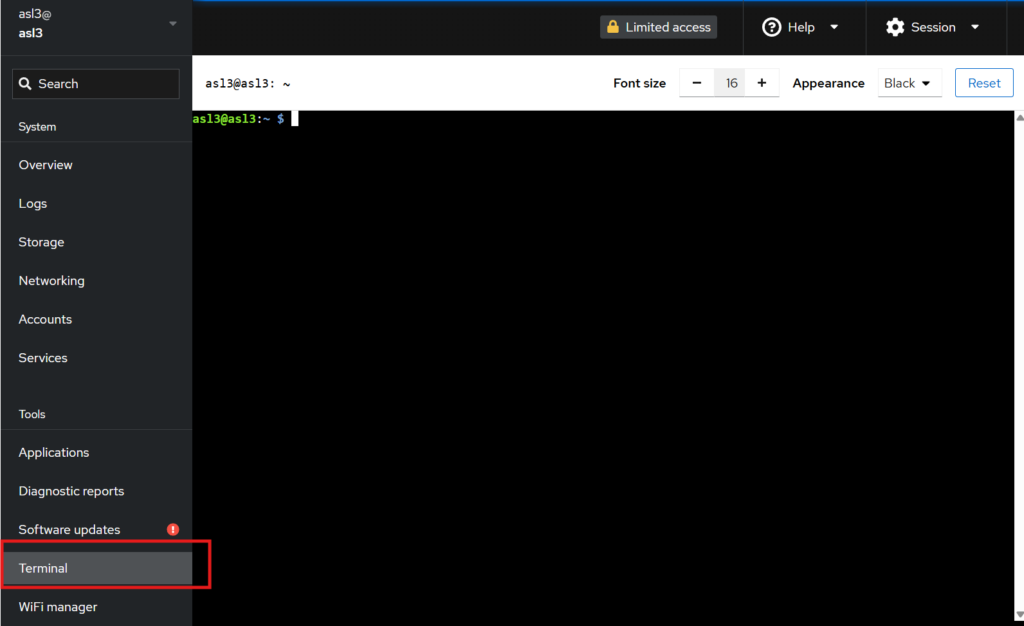
Go to Terminal in the web interface and type:
sudo asl-menu
here we work through the menu steps as follows:
- Select 1 : Node settings
- Select 1 : Allstar Node Setup Menu
- Enter your node number
- Enter your node password
- Set duplex type 1 — half duplex hotspot
- Select SimpleUSB as the channel driver
- Enter your callsign
- Restart Asterisk
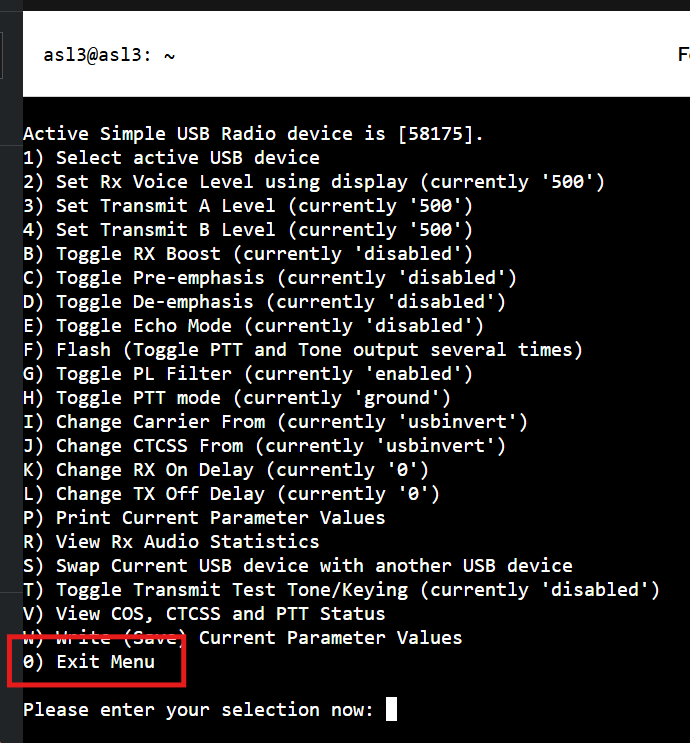
- When you reach the tune menu, quit out (option 0)— don’t tune yet
- Follow the process to exit the ASL-tune menus
- Leave the terminal open — you’ll need it again shortly
Step 3 — Enable Hardware COS on the AIOC
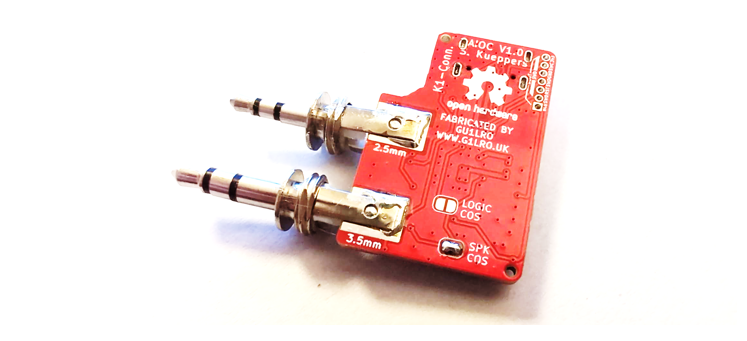
The G1LRO dual-COS AIOC has two COS jumper pads on the PCB. Bridge the correct one with a small solder blob for your radio type:
| Radio type | Jumper to bridge |
|---|---|
| Tidradio H3 with new firmware, SA818, logic-level COS | LOGIC COS |
| Standard Baofeng, Quansheng type radio, speaker output | SPK COS |
Once bridged, connect the AIOC to your Raspberry Pi — the lights will flash to confirm it’s been recognised.
Different AIOC? If your AIOC, URC or radio doesn’t support a useable Hardware COS option, Virtual COS (VCOS) can be used as a last resort — see the VCOS section below. Be aware that VCOS can clip the beginning or end of transmissions and drop mid-stream during quiet moments in speech. Hardware COS is strongly preferred.
Step 4 — Configure the AIOC
With the AIOC bridged for hardware COS, now tell the firmware which COS method to use.
- Plug the AIOC into your PC or laptop (not the Pi — the config utility needs WebUSB direct access).
- Browse to: https://g1lro.github.io/aioc-util/
- Click Connect and select the AIOC device.
- Enable Hardware COS and click Apply.
- Scroll down past the status pane and click Store to Flash.
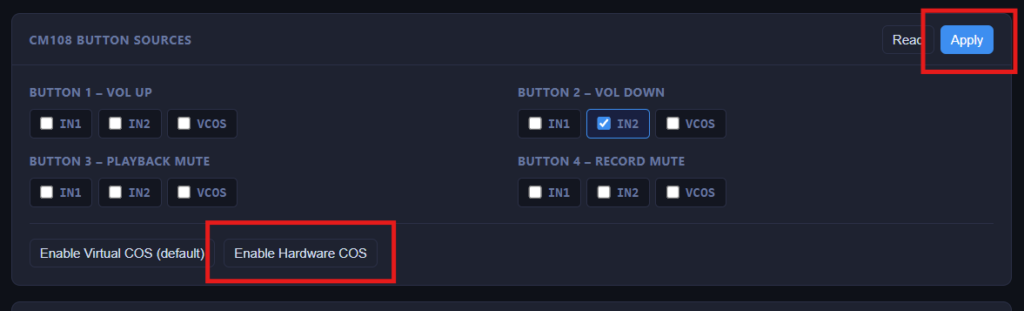

Don’t miss Store to Flash! It’s tucked below the status display and easy to overlook. Settings that are only applied but not stored will be lost the moment the AIOC is unplugged.
Step 5 — Configure ASL3 for the AIOC
Go back to the terminal on the Pi (via the web admin portal or SSH) and (copy/paste) run these two commands:
wget -O customize.sh https://raw.githubusercontent.com/G1LRO/AIOC-ASL3-Config/main/customize.sh

sudo bash customize.sh
That’s it. The script handles everything, here is a list of the changes made:
| Step | File | What it does |
|---|---|---|
| 1 | res_usbradio.conf | Enables the AIOC USB device (1209:7388) |
| 2 | Asterisk | Restarts so the AIOC is recognised immediately |
| 3 | simpleusb.conf | Sets correct PTT, COS, and CTCSS settings |
| 4 | rpt.conf | Sets half duplex mode |
Timestamped backups of all modified config files are created before any changes are made.
Full details of this script are at: https://github.com/G1LRO/AIOC-ASL3-Config
Step 6 — Tune the ASL3
Before tuning, prepare your node HT:
- Set it to a quiet frequency with squelch closed
- Set it to lowest TX power
- Test calling the node HT from your second radio to confirm audio is clear — set volume around 50%, not distorting
Now plug the AIOC into the radio (with the other end still connected to the Pi), return to the terminal and run:
sudo simpleusb-tune-menu
Work through the tune menu:
| Option | What to do |
|---|---|
| V | Verify COS — key the node HT and confirm COS opens; unkey and confirm it closes |
| e | Echo test — transmit to the node HT, you should hear yourself played back |
| 2 | Set audio levels — use the volume control on the node HT as your primary adjustment |
| W | Write settings when everything sounds good |
Audio level tip: Always start audio level adjustment with the radio’s volume knob — it has the biggest effect and keeps your software gain settings in a sensible range.
That’s it!
Your AllStarLink node is up and running.
Do some basic tests with a connection to the Hubnet Parrot node 40894 and check everything sounds great.
Here it is in action:
Appendix: Virtual COS (VCOS) — Last Resort
If hardware COS isn’t an option for your radio, VCOS can work in some situations. Rather than detecting the RF carrier, VCOS monitors the audio level — silence means no carrier, audio means carrier.
⚠️ VCOS limitations: Because it works on audio level rather than RF carrier, VCOS can clip the start or end of a transmission and drop mid-stream during quiet moments in speech. Use a hardware COS method wherever possible.
Hard limit: If your radio’s audio output is continuously noisy when unsquelched — for example, a data port with no hardware squelch — VCOS will not work at all.
Configuring VCOS
In the AIOC utility (https://g1lro.github.io/aioc-util/):
- Enable Virtual COS.
- Set the VCOS threshold to approximately 1500 — think of this as a squelch control. Too low and background noise holds COS open; too high and legitimate signals won’t trigger it.
- Set the VCOS timing to approximately 8000.
- Click Apply, then scroll down and click Store to Flash.
In the tune menu, set Carrier From to usb (active high — the normal VCOS setting).
Verify the activity of the virtual COS by seeing the GPIO (Vol−) trigger on received audio in the AIOC utility – this will be the COS signal for ASL3
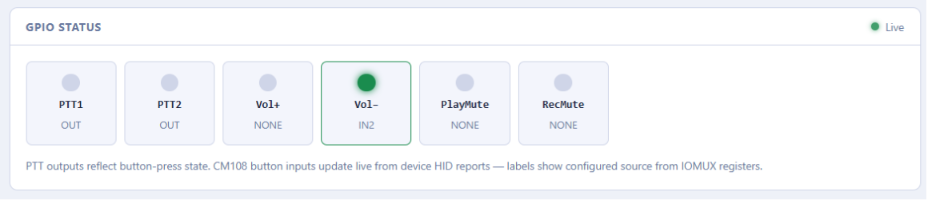
Re-flash the AIOC
If you want to clear any previos settings in your AIOC or load the latest firmware then this simple guide helps:
Configure the AIOC for programming by bridging the two end holes on the programming header, then connect to your PC:
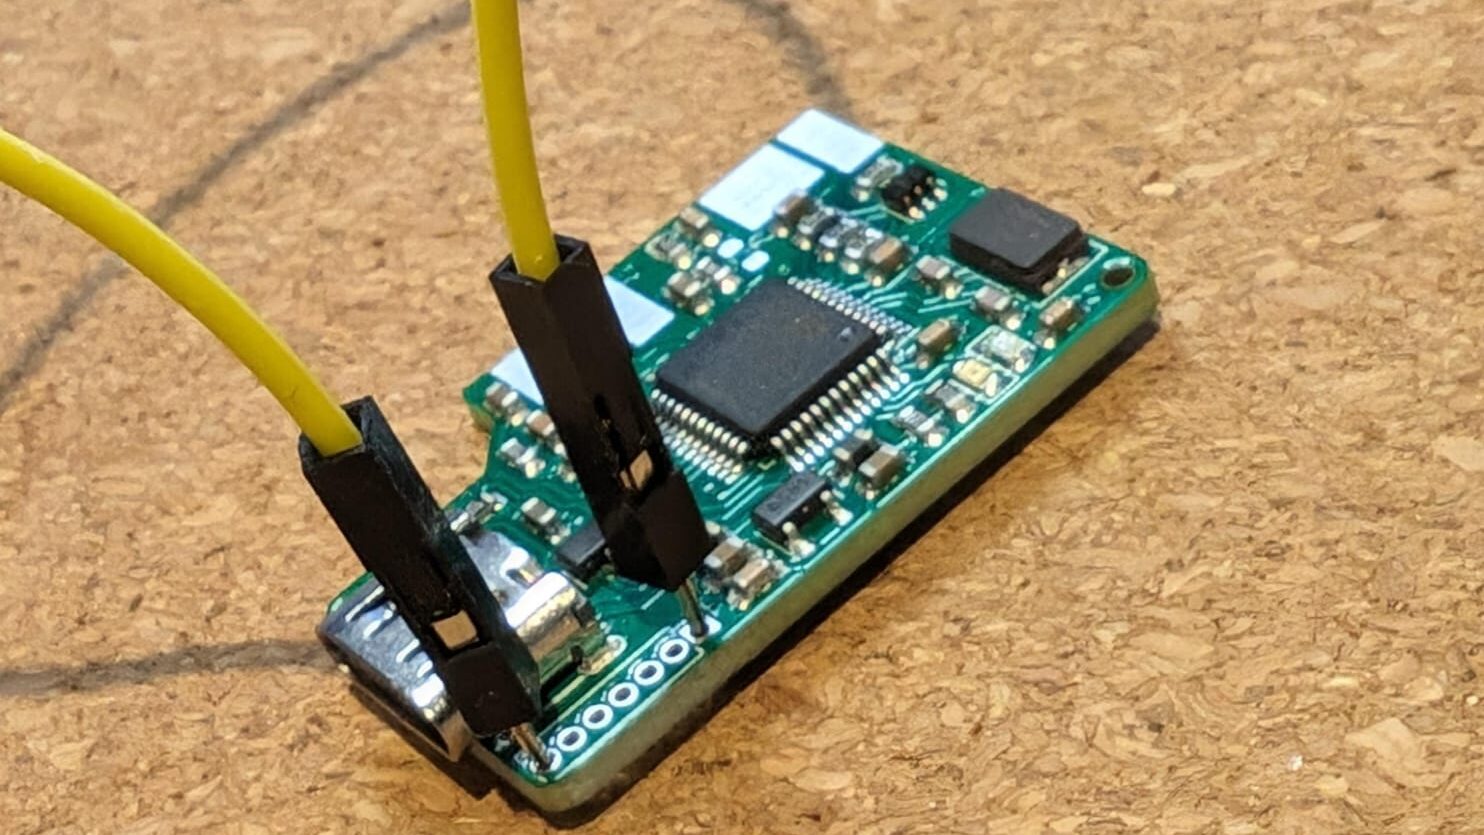
Download AIOC Firmware file: https://github.com/skuep/AIOC/releases/download/v1.4.1/aioc-fw-1.4.1.bin
Browse to web-based software loader: https://devanlai.github.io/webdfu/dfu-util/
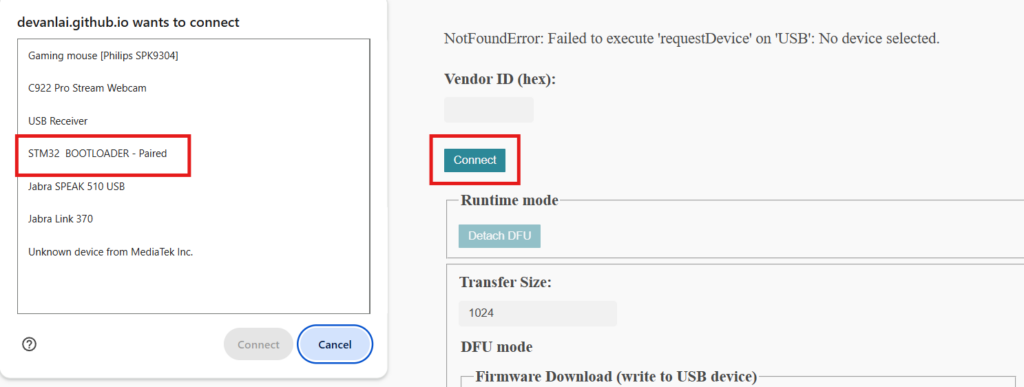
Connect the AIOC then click connect in the browser
Select the device STM32 Bootloader then Internal Flash
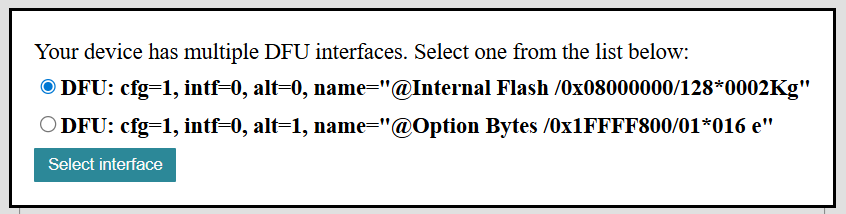
Choose the AIOC firmware file previously downloaded and click download
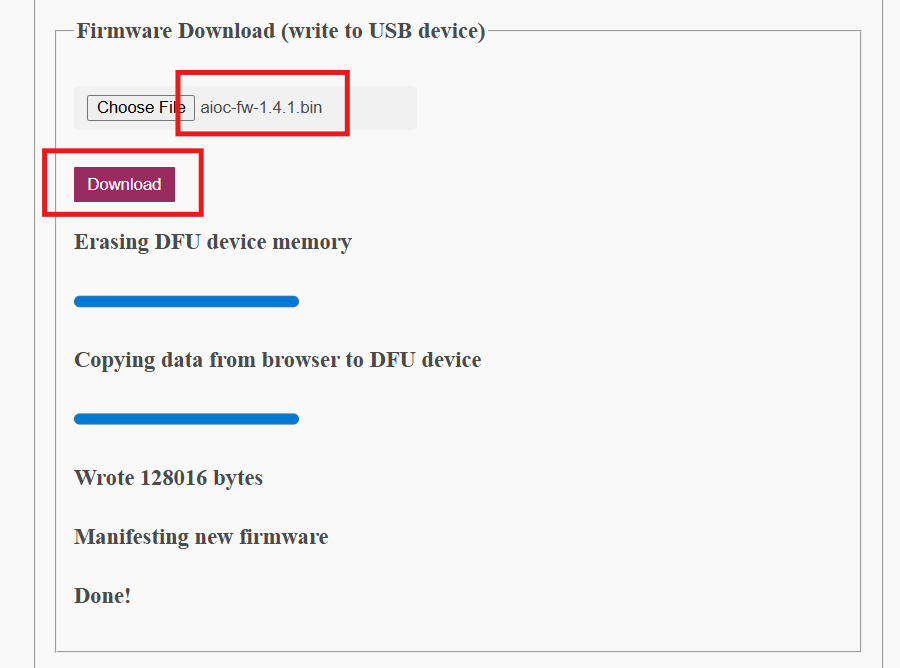
Disconnect AIOC from USB after flashing
Troubleshooting
COS permanently open (node always keyed)
- With
usbinvert: try switching tousb - With VCOS: threshold may be too low — raise it in the AIOC utility and store to flash
- Check radio: continuous audio noise on the output means VCOS won’t work — you need hardware COS
COS never opens
- Try toggling between
usbandusbinvertin the tune menu - With VCOS: threshold may be too high — lower it
Node keying in a loop
- Almost always a duplex setting issue — confirm
duplex = 1inrpt.conf
AIOC not recognised by ASL3
- Run
lsusband confirm you see1209:7388 - Confirm the
customize.shscript has been run and Asterisk restarted
73 de G1LRO