
We’re pleased to announce a significant firmware update for all RLNZ2
units, and the introduction of the new Mainboard v2 with enhanced
capabilities.
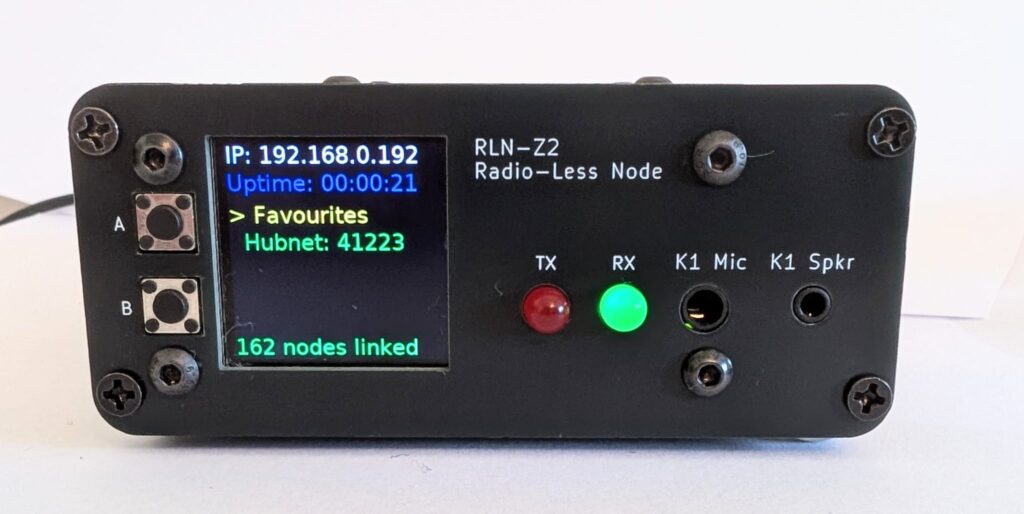
FIRMWARE UPDATE: KEY IMPROVEMENTS
The latest firmware release brings three substantial improvements to
the RLNZ2 experience:
- AllScan Integration, Bundled and Pre-Configured
AllScan, the powerful AllStarLink Favorites Management and Scanning
web app, is now bundled with the RLNZ2 firmware. More importantly,
username and password management is now integrated directly into the
RLNZ2 configuration screen. When you set your credentials during
initial setup, they automatically apply to AllScan – no manual
configuration needed. You’ll log in with the username rln and your
chosen password, and you’re straight in.
- Responsive Button Controls
Based on user feedback, button responsiveness has been significantly
improved. The front-panel buttons (A and B) now feel snappier and more
immediate, making menu navigation and node selection faster and more
fluid.
- Real-Time Linked Node Count
A new display feature shows the number of nodes currently linked to
whichever node you’re connected to. This appears at the bottom of the
screen and is particularly useful when connecting to busy hubs – you’ll
see at a glance how many other nodes are active on that link.
MAINBOARD V2: NEW CAPABILITIES
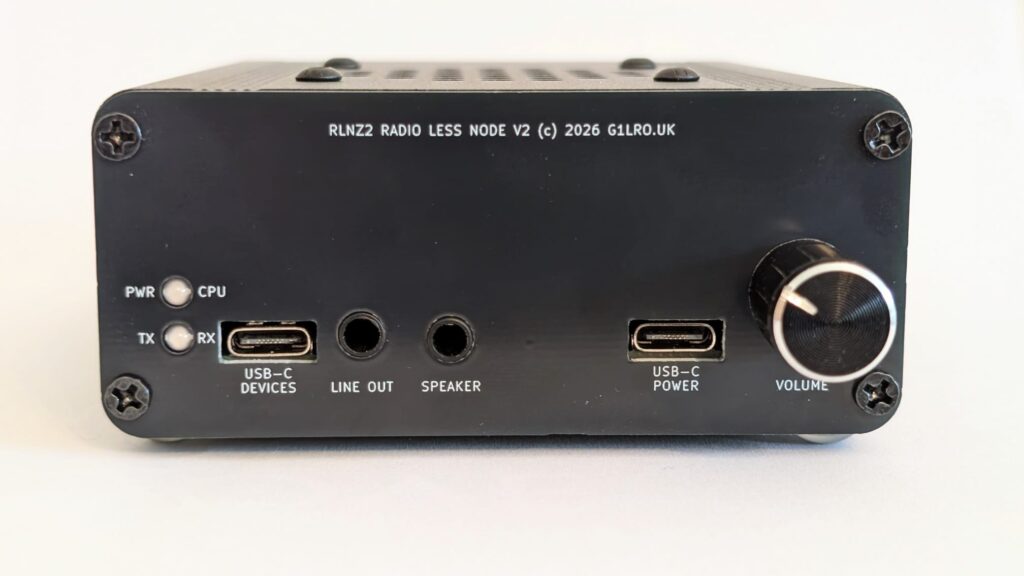
The new Mainboard v2 introduces hardware refinements that expand the
RLNZ2’s functionality:
Additional USB-C Port for Expansion
The rear panel now includes a second USB-C port, allowing you to
connect ancillary devices such as wired Ethernet adapters or
USB transceivers (such as the SA818). Full
documentation on integration and supported peripherals will be
available shortly as we complete testing.
Improved Audio Quality
The mainboard redesign includes general audio quality improvements
throughout the signal path. These refinements enhance overall audio
fidelity across transmission and reception.
HOW TO UPDATE
Firmware-Only Update (Current Users)
If you have an existing RLNZ2 and wish to update only the firmware:
- Download the latest SD card image from https://g1lro.uk/images/ the image is in the main folder ready for download
- Remove the front panel (4 corner screws) and top rear screws to remove the front panel and lid, and carefully extract the SD card
- On your computer, download and launch Raspberry Pi Imager
- Select the custom firmware option and load the downloaded image –
no additional settings are needed - Insert the SD card into your computer and flash using Imager
- Reinsert the SD card, reassemble the front panel, and power on
- The system will boot to the startup screen within 1-2 minutes
Refer to the User Guide (Appendix: Loading a New Software Update)
for detailed step-by-step instructions with photos.
Upgrading to Mainboard v2
The Mainboard v2 upgrade kit is now available for purchase on the
website. The kit includes everything needed for a straightforward swap:
- New Mainboard v2
- Replacement rear panel (updated for the new USB-C port layout)
- New volume control knob
No soldering required – it’s purely mechanical: a few screws and a
slide-in installation. Full assembly instructions will be provided
with the kit.
We have initial stock available now, with additional inventory arriving
over the coming weeks as demand becomes clear. If you’re interested in
upgrading your existing RLNZ2, head to the website to order your kit.
New RLNZ2 units ordered now will ship with Mainboard v2 as standard.
FIRMWARE AND MAINBOARD V2 COMPATIBILITY
If you install a v2 mainboard, the new firmware is recommended.
However, if you prefer to keep your existing firmware, a small
compatibility patch is available here. The patch details how to update
your current firmware for full v2 compatibility without performing a
complete firmware flash.
IMPORTANT NOTES
- The new firmware is compatible with both v1 and v2 mainboards
- AllScan credentials are now managed through the RLNZ2 configuration
screen; no separate AllScan setup is required - Always shut down the unit safely (hold both buttons for 5 seconds)
before powering off to avoid SD card corruption
For questions, issues, or feedback, please reach out via the website
link above or join our user community Discord server at https://discord.gg/rrmA4en9jQ